
How To Install PHP For Nginx On Ubuntu 18.04 LTS
Explains all the steps required to install PHP 7 for Nginx on Ubuntu 18.04 LTS.
This tutorial explains all the steps required to install the default distribution of PHP 7 on Ubuntu 18.04 LTS. The steps should be similar to other Linux based systems. It also explains how to configure PHP for Nginx Web Server with FastCGI.
Prerequisites
This tutorial expects that the Nginx is already installed and you have followed the steps to configure the server blocks using separate files for each block as explained at How To Install And Configure Nginx on Ubuntu 18.04 LTS.
Install PHP 7
In this step, we will install PHP 7.2, the default PHP package available for Ubuntu 18.04 LTS release. It can be installed using the command as shown below.
# Refresh package indexes
sudo apt-get update

# Install PHP 7.2 on Ubuntu 18.04 LTS
sudo apt-get install php7.2

# Autoclean
sudo apt-get autoclean

# Autoremove
sudo apt-get autoremove
# OR
sudo apt-get --purge autoremove
It will ask to confirm the installation. Press Y and hit Enter to confirm the installation. The important paths and files of the PHP installation are /usr/lib/php/7.2, /usr/bin/php7.2, and /etc/php/7.2/cli/php.ini.
Install PHP FPM and MySQL Extension
Use the below-mentioned commands to install the PHP FPM and MySQL extensions.
# Install FPM Extension
sudo apt-get install php7.2-fpm

# Install MySQL Extension
sudo apt install php7.2-mysql

# Install MySQL Extension - Required for Wordpress Installation
sudo apt install php-mysql
Additional Extensions
You can also install the additional extensions in order to fully support a web application. Some of these packages might not be required in your scenario, hence it's totally optional to install these extensions.
# Install CGI and CLI if not installed by default
sudo apt-get install php7.2-cgi php7.2-cli

# Install CURL and JSON extensions
sudo apt-get install php7.2-curl php7.2-json

# Install PHP GD and Imagick
sudo apt-get install php7.2-gd php-imagick

# Multibyte String, Internationalization and Spell Check
sudo apt-get install php7.2-mbstring php7.2-intl php7.2-pspell

# Emails
sudo apt-get install php7.2-imap

# SQLite
sudo apt-get install php7.2-sqlite3

# Tidy and XML RPC
sudo apt-get install php7.2-tidy php7.2-xmlrpc

# Excel
sudo apt-get install php7.2-xsl
Install OPcache to enable caching at the bytecode level.
# Install OPcache extension
sudo apt-get install php7.2-opcache
Install the extensions to handle compressed files.
# Install Zip
sudo apt-get install php7.2-zip
These are the steps required to install PHP 7 on Ubuntu 18.04 LTS and the additional packages that are mostly required for the website development.
Configure PHP Processor
We can secure PHP by updating the configuration as shown below.
# Update PHP Configuration
sudo nano /etc/php/7.2/fpm/php.ini

# Update
cgi.fix_pathinfo=0

# Reload PHP FPM
sudo systemctl reload php7.2-fpm
# OR
# Restart PHP FPM
sudo systemctl restart php7.2-fpm

# Test Status
sudo systemctl status php7.2-fpm

# Output
● php7.2-fpm.service - The PHP 7.2 FastCGI Process Manager
   Loaded: loaded (/lib/systemd/system/php7.2-fpm.service; enabled; vendor preset: enabled)
   Active: active (running) since Tue 2019-10-08 13:36:15 UTC; 9s ago
     Docs: man:php-fpm7.2(8)
 Main PID: 26413 (php-fpm7.2)
   Status: "Ready to handle connections"
    Tasks: 3 (limit: 2361)
   CGroup: /system.slice/php7.2-fpm.service
           ├─26413 php-fpm: master process (/etc/php/7.2/fpm/php-fpm.conf)
           ├─26434 php-fpm: pool www
           └─26435 php-fpm: pool www
Important Commands
Below listed are the commands used to start, stop, enable, or disable the PHP FPM process.
# Start PHP FPM
sudo systemctl start php7.2-fpm

# Stop PHP FPM
sudo systemctl stop php7.2-fpm

# Restart PHP FPM
sudo systemctl restart php7.2-fpm

# Enable PHP FPM
sudo systemctl enable php7.2-fpm

# Disable PHP FPM
sudo systemctl disable php7.2-fpm
We can also confirm whether PHP is running using the
# Test PHP
netstat -pl | grep php

# Output
(Not all processes could be identified, non-owned process info
 will not be shown, you would have to be root to see it all.)
unix  2      [ ACC ]     STREAM     LISTENING     75049    -    /run/php/php7.2-fpm.sock
Nginx User Permissions
We have to configure the Nginx system user in order to access the PHP via FPM. Check the system user allowed to access PHP FPM as shown below.
# Check FPM User
sudo nano /etc/php/7.2/fpm/pool.d/www.conf

# Confirm the configuration

listen.owner = www-data

listen.group = www-data

listen.mode = 0660

# Restart FPM
sudo systemctl restart php7.2-fpm
We also need to update the Nginx user by updating the configuration as shown below.
# Update Nginx user
sudo nano /etc/nginx/nginx.conf

# Update

# user nginx;
user  www-data;
...
...

# Test Nginx
sudo nginx -t

# Restart Nginx
sudo systemctl restart nginx
If the Nginx user is not configured, it will log the error as shown below.
# Nginx Permission Error
2019/10/08 14:37:20 [crit] 27012#27012: *8 connect() to unix:/run/php/php7.2-fpm.sock failed (13: Permission denied) while connecting to upstream,
Configure Nginx - Domain Server Block
Now we will configure Nginx to access PHP via FPM since Nginx does not support PHP by default. We will update the domain-specific virtual host or server block as part of this step. In this way, we can enable PHP only for the selected sites instead of enabling it by default for the sites. The default configuration of a site without PHP configuration looks like the one as shown below. You can follow Configure Virtual Host Or Server Block On Nginx to configure domain-specific virtual host or server block.
# Server Block without PHP FPM
sudo nano /etc/nginx/sites-available/example.com

server {
    server_name  example.com www.example.com;

    #charset koi8-r;
    #access_log  /var/log/nginx/host.access.log  main;

    location / {
        root   /var/www/example.com/html;
        index  index.html index.htm;
    }

    ...
    ...
}

# Create Symbolic Link
sudo ln -s /etc/nginx/sites-available/mydomain.com /etc/nginx/sites-enabled/mydomain.com

# Disable Site (only if required)
sudo unlink /etc/nginx/sites-enabled/mydomain.com
Now configure the server block to process all the PHP requests.
# Server Block without PHP FPM
sudo nano /etc/nginx/sites-available/example.com

server {
    server_name  example.com www.example.com;

    #charset koi8-r;
    #access_log  /var/log/nginx/host.access.log  main;

    location / {
        root   /var/www/example.com/html;
        index index.html index.htm;
    }

    ...
    ...

    # pass the PHP scripts to FastCGI
    location ~ \.php$ {
        root /var/www/example.com/html;
        fastcgi_intercept_errors on;
        fastcgi_pass unix:/run/php/php7.2-fpm.sock;
        fastcgi_index index.php;
        fastcgi_param SCRIPT_FILENAME $document_root/$fastcgi_script_name;
        include fastcgi_params;
    }

    # deny access to .htaccess files
    location ~ /\.ht {
        deny all;
    }

    ...
    ...
}

# Reload NGINX
sudo systemctl reload nginx
Now we will create the PHP file to print the output of the phpinfo() function as shown below.
# Add PHP File
sudo nano /var/www/example.com/html/info.php

# Content
<?php
echo phpinfo();

# Save the file and exit the editor
Now open the PHP file in the browser by navigating to http://www.example.com/info.php. It should print the PHP details as shown in Fig 1.
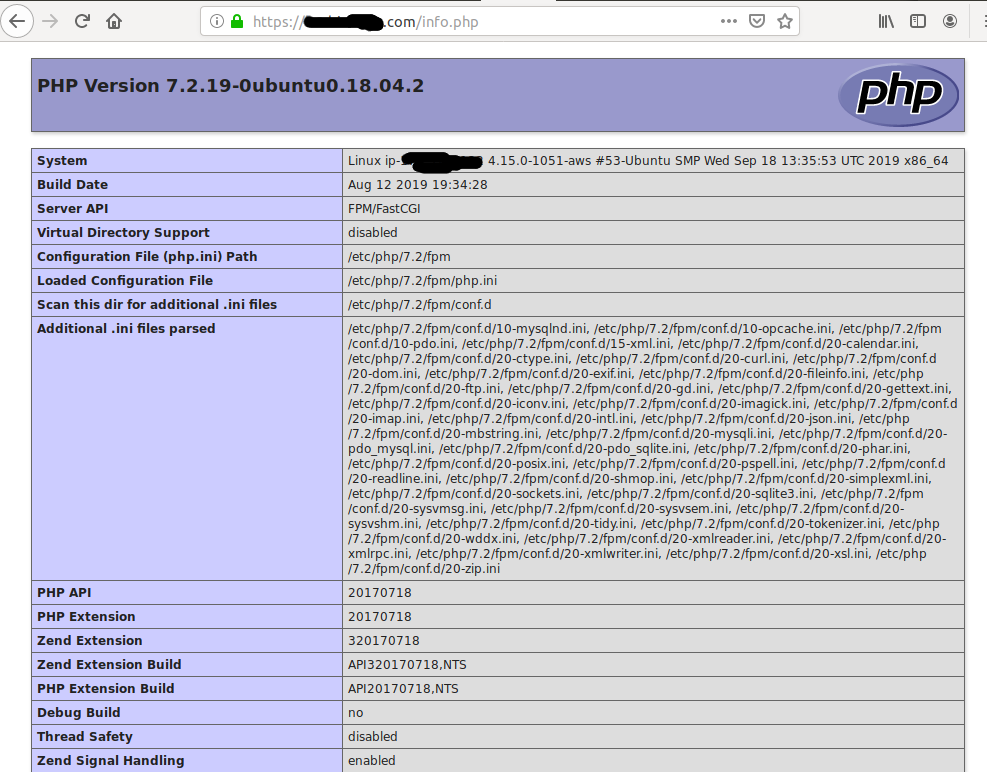
Fig 1
Configure Nginx - Localhost - Default Server Block
This section assumes that you have followed the steps to configure the server blocks using separate files for each block and also moved the default server block to /etc/nginx/sites-available/default as explained at How To Install And Configure Nginx on Ubuntu 18.04 LTS.
# Server Block without PHP FPM
sudo nano /etc/nginx/sites-available/default

server {
    listen       80;
    server_name  localhost;

    #charset koi8-r;
    #access_log  /var/log/nginx/host.access.log  main;

    location / {
        root   /usr/share/nginx/html;
        index  index.html index.htm;
    }

    ...
    ...
}

# Create Symbolic Link
sudo ln -s /etc/nginx/sites-available/default /etc/nginx/sites-enabled/default

# Disable Site (only if required)
sudo unlink /etc/nginx/sites-enabled/default
Now configure the server block to process all the PHP requests.
# Server Block without PHP FPM
sudo nano /etc/nginx/sites-available/default

server {
    listen       80;
    server_name  localhost;

    #charset koi8-r;
    #access_log  /var/log/nginx/host.access.log  main;

    location / {
        root   /usr/share/nginx/html;
        index  index.html index.htm;
    }

    ...
    ...

    # pass the PHP scripts to FastCGI
    location ~ \.php$ {
        root /usr/share/nginx/html;
        fastcgi_intercept_errors on;
        fastcgi_pass unix:/run/php/php7.2-fpm.sock;
        fastcgi_index index.php;
        fastcgi_param SCRIPT_FILENAME $document_root/$fastcgi_script_name;
        include fastcgi_params;
    }

    # deny access to .htaccess files
    location ~ /\.ht {
        deny all;
    }

    ...
    ...
}

# Reload NGINX
sudo systemctl reload nginx
Now we will create the PHP file to print the output of the phpinfo() function as shown below.
# Add PHP File
sudo nano /usr/share/nginx/html/info.php

# Content
<?php
echo phpinfo();

# Save the file and exit the editor
Now open the PHP file in the browser by navigating to http://localhost/info.php. It should print the PHP details as shown in Fig 1.
Summary
This tutorial provided the steps to install PHP 7 on Ubuntu 18.04 LTS and also configure it for the Nginx Web Server. We have also installed the popular extensions for PHP which are required to host web applications.


