
How To Install PHP 8 From Source On Ubuntu 20.04 LTS
It provides all the steps required to compile PHP 8 on Ubuntu 20.04 LTS from the source code with the JIT support.
This tutorial provides all the steps required to compile and install PHP 8 on Ubuntu 20.04 LTS from the Source Code. The steps should be similar on the other versions of Ubuntu and Linux based systems. In case you are planning to use PHP with the Apache HTTP Server and MySQL database server, you can install Apache 2 and MySQL 8 before starting the installation of PHP 8. It can be done by following the guides - How To Install Apache 2 On Ubuntu 20.04 LTS and How To Install MySQL 8 on Ubuntu 20.04 LTS. Also, PHP can be used with NGINX Web Server instead of the Apache HTTP Server. NGINX is widely used as a load balancer and reverse proxy for the Apache Web Server and other servers. You can follow How To Install And Configure Nginx on Ubuntu 20.04 LTS and Configure Virtual Host Or Server Block On Nginx.
Notes: The default version of PHP available for Ubuntu 20.04 LTS is PHP 7.4. You can also follow How To Install PHP 7 On Ubuntu 20.04 LTS. We can also install PHP 8 on Ubuntu 20.04 LTS using PPA as explained in How To Install PHP 8 On Ubuntu 20.04 LTS.
It might be possible that some of the PHP functions used by your projects might not work, since we are making a custom build. You may feel free to build your own version of PHP by selecting the appropriate dependencies and providing the required configurations. I have selected the commonly used dependencies and configurations for the most common uses.
Step 1 - Install Dependencies
In this step, we will install the dependencies required to build PHP from the source code. The below-mentioned commands can be executed to install the dependencies.
# Refresh Packages
sudo apt update

# Build Essentials
sudo apt-get install build-essential

# Install Dependencies
sudo apt install \
 autoconf \
 re2c \
 bison \
 libsqlite3-dev \
 libpq-dev \
 libonig-dev \
 libfcgi-dev \
 libfcgi0ldbl \
 libjpeg-dev \
 libpng-dev \
 libssl-dev \
 libxml2-dev \
 libcurl4-openssl-dev \
 libxpm-dev \
 libgd-dev \
 libmysqlclient-dev \
 libfreetype6-dev \
 libxslt1-dev \
 libpspell-dev \
 libzip-dev \
 libgccjit-10-dev
You may remove libgccjit-10-dev in case you do not need JIT support. Also, it might trigger error like - Unable to locate package libgccjit-10-dev. In such cases, get the most recent version of libgccjit from the Debian Packages.
Step 2 - Download PHP 8 Source Code
We can get the most recent version of PHP 8 source code by cloning it from the GIT repository as shown below.
# Change Directory
cd <sources directory>
# Example:
cd /data/setups

# Clone PHP Source Code
sudo git clone https://github.com/php/php-src.git

# Change Directory
cd php-src
The above command will clone the master directory of PHP 8 from GitHub.
Step 3 - Configure The Build
In this step, we will apply some standard configurations before compiling the source code. There is no configuration file available in the source code cloned by us in the previous step, hence generate the one using the command as shown below.
# Generate Configuration
sudo ./buildconf

# Output
buildconf: Checking installation
buildconf: autoconf version 2.69 (ok)
buildconf: Cleaning cache and configure files
buildconf: Rebuilding configure
buildconf: Rebuilding main/php_config.h.in
buildconf: Run ./configure to proceed with customizing the PHP build.
Now configure the compilation using the below-mentioned command. You may change your configurations according to your requirements.
sudo ./configure \
 --prefix=/opt/php/php8 \
 --enable-cli \
 --enable-fpm \
 --enable-intl \
 --enable-mbstring \
 --enable-opcache \
 --enable-sockets \
 --enable-soap \
 --with-curl \
 --with-freetype \
 --with-fpm-user=www-data \
 --with-fpm-group=www-data \
 --with-jpeg \
 --with-mysql-sock \
 --with-mysqli \
 --with-openssl \
 --with-pdo-mysql \
 --with-pgsql \
 --with-xsl \
 --with-zlib
You can also use the below-mentioned command to view all the available options to further change the configuration.
# View all options
./configure --help
Step 4 - Build
In this step, we will build the PHP from the source code using the configurations generated in the previous step. Now start building the PHP 8 using the commands shown below.
# Make
sudo make
You may also fasten the process by giving the number of cores as shown below.
# Number of processor cores
nroc

# Make
sudo make -j4
You should see an output similar to the one shown below.
-----
-----
Generating phar.php
Generating phar.phar
PEAR package PHP_Archive not installed: generated phar will require PHP's phar extension be enabled.
directorygraphiterator.inc
clicommand.inc
phar.inc
pharcommand.inc
invertedregexiterator.inc
directorytreeiterator.inc

Build complete.
Don't forget to run 'make test'.
We can also test the PHP compiled by us using the test command as shown below.
# Test Installation
sudo make test
Step 5 - Install PHP 8
Now complete the installation by executing the below-mentioned command.
# Install
sudo make install

# Output
Installing shared extensions:     /opt/php/php8/lib/php/extensions/no-debug-non-zts-20201009/
Installing PHP CLI binary:        /opt/php/php8/bin/
Installing PHP CLI man page:      /opt/php/php8/php/man/man1/
Installing PHP FPM binary:        /opt/php/php8/sbin/
Installing PHP FPM defconfig:     /opt/php/php8/etc/
Installing PHP FPM man page:      /opt/php/php8/php/man/man8/
Installing PHP FPM status page:   /opt/php/php8/php/php/fpm/
Installing phpdbg binary:         /opt/php/php8/bin/
Installing phpdbg man page:       /opt/php/php8/php/man/man1/
Installing PHP CGI binary:        /opt/php/php8/bin/
Installing PHP CGI man page:      /opt/php/php8/php/man/man1/
Installing build environment:     /opt/php/php8/lib/php/build/
Installing header files:          /opt/php/php8/include/php/
Installing helper programs:       /opt/php/php8/bin/
  program: phpize
  program: php-config
Installing man pages:             /opt/php/php8/php/man/man1/
  page: phpize.1
  page: php-config.1
/data/setups/php-src/build/shtool install -c ext/phar/phar.phar /opt/php/php8/bin/phar.phar
ln -s -f phar.phar /opt/php/php8/bin/phar
Installing PDO headers:           /opt/php/php8/include/php/ext/pdo/
It will install PHP to the destination directory configured by us while generating the configuration file. We have installed PHP 8 at /opt/php/php8. Now verify the installation by using the below-mentioned command.
# Check PHP Version
/opt/php/php8/bin/php -v

# Output
PHP 8.1.0-dev (cli) (built: Mar 30 2021 09:50:54) ( NTS )
Copyright (c) The PHP Group
Zend Engine v4.1.0-dev, Copyright (c) Zend Technologies
While writing this tutorial, the steps mentioned in this tutorial installed PHP 8.1 on Ubuntu 20.04 LTS. The same steps can be used on Ubuntu 18.04 LTS.
Configure JIT Support for PHP 8
To test the support for JIT, we must enable the opcache extension as shown below.
# Check PHP ini Path
/opt/php/php8/bin/php --ini

# Output
Configuration File (php.ini) Path: /opt/php/php8/lib
Loaded Configuration File:         (none)
Scan for additional .ini files in: (none)
Additional .ini files parsed:      (none)
It clearly shows that there is no php.ini file available at the desired location i.e. /opt/php/php8/lib. We can copy the php.ini-development or php.ini-production from the php-src directory and rename it to php.ini as shown below.
# Copy and create php.ini
sudo cp /data/setups/php-src/php.ini-production /opt/php/php8/lib/php.ini

# Check PHP ini Path
/opt/php/php8/bin/php --ini

# Output
Configuration File (php.ini) Path: /opt/php/php8/lib
Loaded Configuration File:         /opt/php/php8/lib/php.ini
Scan for additional .ini files in: (none)
Additional .ini files parsed:      (none)
We can see that our copied ini file has been identified and loaded as the default php.ini file.
Now enable opcache extension by updating the file as shown below.
# Update php.ini
sudo nano /opt/php/php8/lib/php.ini

# Enable opcache extension
----
----
;extension=sqlite3
;extension=tidy
;extension=xsl

zend_extension=opcache

;;;;;;;;;;;;;;;;;;;
; Module Settings ;
;;;;;;;;;;;;;;;;;;;
----
----
Now check whether opcache extension is enabled using the below-mentioned command.
# Check PHP Version
/opt/php/php8/bin/php -v

# Output
PHP 8.1.0-dev (cli) (built: Mar 30 2021 09:50:54) ( NTS )
Copyright (c) The PHP Group
Zend Engine v4.1.0-dev, Copyright (c) Zend Technologies
    with Zend OPcache v8.1.0-dev, Copyright (c), by Zend Technologies
With this, you must end with the latest PHP with JIT support. Now write a simple script to test with and without JIT.
# Create File
sudo nano /data/programs/test.php

# Program - Reference - https://arkadiuszkondas.com/compiling-php-8-from-source-with-jit-support/

<?php
for( $i = 0; $i < 100; $i++ ) {

        echo "Testing JIT Support";
}

# Execute without JIT
/opt/php/php8/bin/php /data/programs/test.php

# Execute with JIT
/opt/php/php8/bin/php -d opcache.enable_cli=1 -d opcache.jit_buffer_size=50000000 -d opcache.jit=1235 /data/programs/test.php
# OR
/opt/php/php8/bin/php -d opcache.enable_cli=1 -d opcache.jit_buffer_size=50000000 -d opcache.jit=1235 -d opcache.jit_debug=1 /data/programs/test.php

# Output with JIT
-----
	mov $0x558e435c2c90, %rax
	call *%rax
	mov $EG(exception), %rax
	cmp $0x0, (%rax)
	jnz JIT$$exception_handler
	jmp .L2
.L1:
	mov $0x7fbf741db680, %rax
	mov %rax, (%r14)
-----
The generated assembler code confirms that JIT support is enabled.
Enable PHP-FPM for PHP 8
We can configure the PHP 8 for the Apache Web Server and NGINX by updating the php.ini and php-fpm.conf is shown below.
# Check PHP ini Path (configured in the previous step)
/opt/php/php8/bin/php --ini

# Output
Configuration File (php.ini) Path: /opt/php/php8/lib
Loaded Configuration File:         /opt/php/php8/lib/php.ini
Scan for additional .ini files in: (none)
Additional .ini files parsed:      (none)
The above command confirms the location of the php.ini file. Update the php.ini file as shown below.
# Update php.ini
sudo nano /opt/php/php8/lib/php.ini

# Make appropriate changes
zend_extension=/opt/php/php8/lib/php/extensions/no-debug-non-zts-20201009/opcache.so
opcache.enable = 1
opcache.enable_cli = 1
opcache.memory_consumption = 128
opcache.interned_strings_buffer = 8
opcache.max_accelerated_files = 10000
opcache.use_cwd = 0
opcache.validate_timestamps = 0
opcache.save_comments = 0
opcache.load_comments = 0
opcache.enable_file_override = 1
Now create the configuration file of PHP-FPM as shown below.
# Create PHP-FPM configuration file
sudo cp /opt/php/php8/etc/php-fpm.conf.default /opt/php/php8/etc/php-fpm.conf
Also, update the php-fpm.conf as shown below.
# Update php-fpm.conf
sudo nano /opt/php/php8/etc/php-fpm.conf

# Scroll to last and update the conf as shown below
----
----
;include=/opt/php/php8/etc/php-fpm.d/*.conf

pid = run/php-fpm.pid
[www]
user = www-data
group = www-data
listen = 127.0.0.1:8999
pm = dynamic
pm.max_children = 10
pm.start_servers = 2
pm.min_spare_servers = 2
pm.max_spare_servers = 4
Now create the init script to start PHP-FPM on system start.
# Create Init Script
sudo nano /etc/init.d/php-8-fpm

# Update the script

#! /bin/sh
### BEGIN INIT INFO
# Provides:          php-8-fpm
# Required-Start:    $all
# Required-Stop:     $all
# Default-Start:     2 3 4 5
# Default-Stop:      0 1 6
# Short-Description: starts php-8-fpm
# Description:       starts the PHP FastCGI Process Manager daemon
### END INIT INFO
php_fpm_BIN=/opt/php/php8/sbin/php-fpm
php_fpm_CONF=/opt/php/php8/etc/php-fpm.conf
php_fpm_PID=/opt/php/php8/var/run/php-fpm.pid
php_opts="--fpm-config $php_fpm_CONF"

wait_for_pid () {
        try=0
        while test $try -lt 35 ; do
                case "$1" in
                        'created')
                        if [ -f "$2" ] ; then
                                try=''
                                break
                        fi
                        ;;
                        'removed')
                        if [ ! -f "$2" ] ; then
                                try=''
                                break
                        fi
                        ;;
                esac
                echo -n .
                try=`expr $try + 1`
                sleep 1
        done
}
case "$1" in
        start)
                echo -n "Starting php-fpm "
                $php_fpm_BIN $php_opts
                if [ "$?" != 0 ] ; then
                        echo " failed"
                        exit 1
                fi
                wait_for_pid created $php_fpm_PID
                if [ -n "$try" ] ; then
                        echo " failed"
                        exit 1
                else
                        echo " done"
                fi
        ;;
        stop)
                echo -n "Gracefully shutting down php-fpm "
                if [ ! -r $php_fpm_PID ] ; then
                        echo "warning, no pid file found - php-fpm is not running ?"
                        exit 1
                fi
                kill -QUIT `cat $php_fpm_PID`
                wait_for_pid removed $php_fpm_PID
                if [ -n "$try" ] ; then
                        echo " failed. Use force-exit"
                        exit 1
                else
                        echo " done"
                       echo " done"
                fi
        ;;
        force-quit)
                echo -n "Terminating php-fpm "
                if [ ! -r $php_fpm_PID ] ; then
                        echo "warning, no pid file found - php-fpm is not running ?"
                        exit 1
                fi
                kill -TERM `cat $php_fpm_PID`
                wait_for_pid removed $php_fpm_PID
                if [ -n "$try" ] ; then
                        echo " failed"
                        exit 1
                else
                        echo " done"
                fi
        ;;
        restart)
                $0 stop
                $0 start
        ;;
        reload)
                echo -n "Reload service php-fpm "
                if [ ! -r $php_fpm_PID ] ; then
                        echo "warning, no pid file found - php-fpm is not running ?"
                        exit 1
                fi
                kill -USR2 `cat $php_fpm_PID`
                echo " done"
        ;;
        *)
                echo "Usage: $0 {start|stop|force-quit|restart|reload}"
                exit 1
        ;;
esac
Also, make the script executable and start on system start as shown below.
# Change Mode
sudo chmod 755 /etc/init.d/php-8-fpm

# Make Executable
sudo update-rc.d php-8-fpm defaults
This completes the configuration of PHP-FPM for the web servers. The web servers including Apache Web Server and NGINX can pass PHP specific requests to PHP-FPM for execution and generates the output of the PHP scripts.
Also, test PHP-FPM before system restart by executing it as shown below.
# Start PHP-FPM
sudo /etc/init.d/php-8-fpm start

# Output
Starting php-fpm  done

# Stop PHP-FPM
sudo /etc/init.d/php-8-fpm stop

# Output
Gracefully shutting down php-fpm . done
 done
Configure Apache for PHP 8
We can configure the PHP 8 installed by us to use with Apache 2 on Ubuntu 20.04 LTS. In case it's not installed yet, you can follow How To Install Apache 2 On Ubuntu 20.04 LTS. After installing Apache 2 on Ubuntu 20.04 LTS, configure the PHP 8 installed by us as shown below.
# Install Apache Extension
sudo apt install libapache2-mod-fcgid

# Enable the extensions
sudo a2enmod actions fcgid alias
sudo a2enmod proxy
sudo a2enmod proxy_http
sudo a2enmod proxy_fcgi


# Restart Apache
sudo systemctl restart apache2
Also, update the default host to process the PHP script via PHP-FPM as shown below.
# Update Default Host
sudo nano /etc/apache2/sites-available/000-default.conf

# Update
----
----
        #ServerName www.example.com

        ServerAdmin webmaster@localhost
        DocumentRoot /var/www/html

        ProxyPassMatch ^/(.*\.php(/.*)?)$ fcgi://127.0.0.1:8999/var/www/html/$1
        DirectoryIndex /index.php index.php

        # Available loglevels: trace8, ..., trace1, debug, info, notice, warn,
        # error, crit, alert, emerg.
----
----
Now test the configuration changes as shown below.
# Apache Config Test
sudo apachectl configtest

# Output
Syntax OK
Also, restart Apache as shown below.
# Reload Apache
sudo systemctl restart apache2
Now create the info.php file at the root of the Apache Web Server. You may also create the default file index.php at the root of the Apache Web Server.
# Test phpinfo
sudo nano /var/www/html/info.php

# Update
<?php
echo phpinfo();
Now open the browser and request info.php. It should be similar to Fig 1.
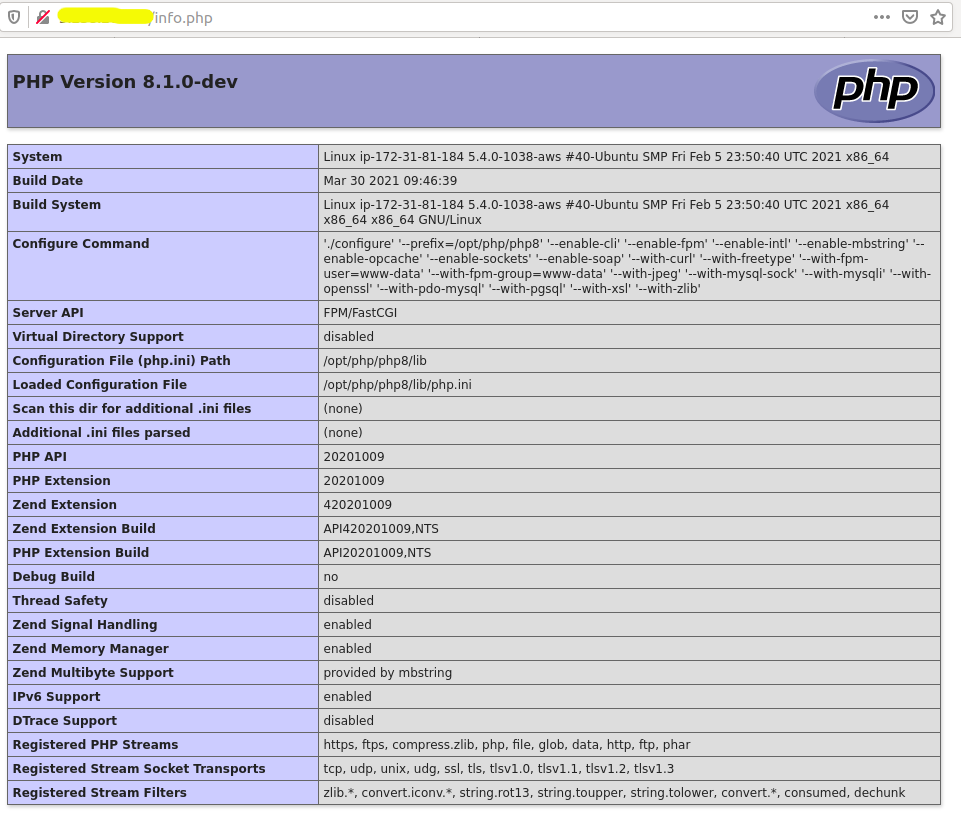
Fig 1
Configure NGINX for PHP 8
In the previous step, we have configured the Apache Web Server to use PHP-FPM as reverse proxy to execute PHP scripts. In this step, we will configure NGINX to execute the PHP scripts using PHP-FPM as reverse proxy.
Update the Nginx user by updating the configuration as shown below.
# Update Nginx user
sudo nano /etc/nginx/nginx.conf

# Update

# user nginx;
user  www-data;
...
...

# Test Nginx
sudo nginx -t

# Restart Nginx
sudo systemctl restart nginx
Now we will configure Nginx to access PHP via FPM since Nginx does not support PHP by default. Update the default server block of NGINX as shown below.
# Update Server Block
sudo nano /etc/nginx/sites-available/default

# Update
----
----
server {
        listen 80 default_server;
        listen [::]:80 default_server;
----
----
        # Add index.php to the list if you are using PHP
        index index.php index.html index.htm index.nginx-debian.html;
----
----
        # pass PHP scripts to FastCGI server
        #
        location ~ \.php$ {
                include snippets/fastcgi-php.conf;
        #
        #       # With php-fpm (or other unix sockets):
        #       fastcgi_pass unix:/var/run/php/php7.4-fpm.sock;
        #       # With php-cgi (or other tcp sockets):
                fastcgi_pass 127.0.0.1:8999;
        }
----
----
Now, reload NGINX to apply the configuration changes.
# Reload NGINX
sudo systemctl reload nginx
Also, create the info.php file in the root directory of nginx as shown below.
# Create info.php
sudo nano /usr/share/nginx/html/info.php

# Content
<?php
echo phpinfo();
Now, access the info.php from the browser as we did for Apache Web Server in the previous section. It should show the output similar to Fig 1.
Summary
This tutorial provided all the steps required to install PHP 8 on Ubuntu 20.04 LTS using the source code with JIT support. It also provided the steps to configure PHP-FPM to start on system restart. The last two sections of this tutorial provided the steps to configure Apache Web Server and NGINX to use PHP-FPM as a reverse proxy to process PHP requests.


